ant file copy 옵션 주의사항
꼭 overwrite, force, verbose 속성을 true로 놓자.
참고할 웹사이트
ant file copy 옵션 주의사항
꼭 overwrite, force, verbose 속성을 true로 놓자.
참고할 웹사이트
일하다가 이것때문에 시간을 마니 잡아먹어서 기억할 겸 메모한다.
처음에는 org.apache.xerces.dom.DocumentImpl와 org.w3c.dom.Document, DOMImplementationRegistry, DOMImplementationLS 를 사용했는데(how-can-i-build-an-html-org-w3c-dom-document),
라이브러리가 꼬여서 다른방법이 없나 찾아보다가 DocumentBuilder,TransformerFactory를 사용하는 방법으로 구현했다.
import java.io.StringWriter;

import javax.xml.parsers.DocumentBuilder;
import javax.xml.parsers.DocumentBuilderFactory;
import javax.xml.parsers.ParserConfigurationException;
import javax.xml.transform.OutputKeys;
import javax.xml.transform.Transformer;
import javax.xml.transform.TransformerConfigurationException;
import javax.xml.transform.TransformerException;
import javax.xml.transform.TransformerFactory;
import javax.xml.transform.dom.DOMSource;
import javax.xml.transform.stream.StreamResult;

import org.w3c.dom.Document;
import org.w3c.dom.Element;

public class CustomTest {

	public CustomTest() {

	}
	public String makeElement() {
		StringBuffer sb = new StringBuffer();

		DocumentBuilderFactory factory = DocumentBuilderFactory.newInstance();
		DocumentBuilder builder = null;
		try {
			builder = factory.newDocumentBuilder();
		} catch (ParserConfigurationException e) {
			e.printStackTrace();
		}
		Document htmlDoc = builder.newDocument();
        Element ulElement = htmlDoc.createElement("ul");
        Element liElement = htmlDoc.createElement("li");
        Element aElement = htmlDoc.createElement("a");
        aElement.setAttribute("href", "#none");
    	aElement.setTextContent("Test");
    	liElement.appendChild(aElement);
    	ulElement.appendChild(liElement);
        TransformerFactory transFactory = TransformerFactory.newInstance();
        Transformer transformer =null;
        StringWriter buffer = null;
		try {
			transformer = transFactory.newTransformer();
			buffer = new StringWriter();
			transformer.setOutputProperty(OutputKeys.INDENT, "yes");
	        transformer.setOutputProperty(OutputKeys.OMIT_XML_DECLARATION, "yes");
	        transformer.transform(new DOMSource(ulElement),
				      new StreamResult(buffer));
		} catch (TransformerConfigurationException e1) {
			// TODO Auto-generated catch block
			e1.printStackTrace();
		} catch (TransformerException e) {
			// TODO Auto-generated catch block
			e.printStackTrace();
		}

        sb.append(buffer);
		return sb.toString();

	}

	public static void main(String[] args) {
		// TODO Auto-generated method stub
		CustomTest cm = new CustomTest();
		System.out.println("start!!");
		//StringBuffer sb = new StringBuffer();
		//sb.append(menu.getHtmlHelpPage(""));
		System.out.print(cm.makeElement());
	}

}
결과:
<ul>
<li>
<a href=”#none”>Test</a>
</li>
</ul>
이클립스 환경셋팅 셋팅 중인데, UTF-8 인코딩설정이 필요해서 구글링해보니 역시 어떤 훌륭하신 분이 친절하게 설명해주셨다.
갱짱.Study 님의 블로그http://gangzzang.tistory.com/entry/%EC%9D%B4%ED%81%B4%EB%A6%BD%EC%8A%A4-%EA%B0%9C%EB%B0%9C%ED%99%98%EA%B2%BD-UTF8-%EC%9D%B8%EC%BD%94%EB%94%A9-%EC%84%A4%EC%A0%95
스프링
RESTful방식 세세한 설정 (qhsdud1233님 네이버블로그)
http://blog.naver.com/qhsdud1233/220763398813
웹IDE : goorm.io
PaaP : devpack(Obics)
웹서비스 : Spring boot
테스트 삼아서 위의 셋업으로 개발환경을 구성
잘안되는 문제가 발생하면 구글링을 통해서 도움을 많이 받았으므로,
대표적으로 도움받은 사이트를 링크한다.
중간에 이상한 문제들이 많았는데, 이런 문제를 해결하는게 갈 수록 힘들다.
그냥 서비스 개발에만 치중하고 싶다.
구름IDE에서 소스컴파일, 실행하는 명령어
mvn clean package && java -jar target/gs-rest-service-0.1.0.jar
구름IDE에서 devpack로 푸쉬하는 명령어
cf push sample(서비스이름) -p target/gs-rest-service-0.1.0.jar
applications:
- name: sample
  host: poteto6
  #buildpack: https://github.com/gratiartis/java-buildpack
  #buildpack: https://github.com/cloudfoundry/java-buildpack
  buildpack: java_buildpack
  domain: devpack.co.kr
  #services:
  #- mysql1
http://stackoverflow.com/questions/37225444/spring-boot-application-does-not-start-in-cloudfoundry
아주 잘 정리된 문서를 보면 꼭 스크랩해 놓고싶다.
더군다나 이해하기 쉽게도 적어놓으셨다.
대단하신 분인듯
1.설치환경
2.Apache Web server설정
3.Tomcat Application Server 설정
4.Web Application에 Clustering이 가능하도록 설정
5.Clustering Test
추가)
1. apache 1.2.7버전이후로
worker.loadbalancer.balanced_workers=tomcat1,tomcat2
–> worker.loadbalancer.balance_workers=tomcat1,tomcat2
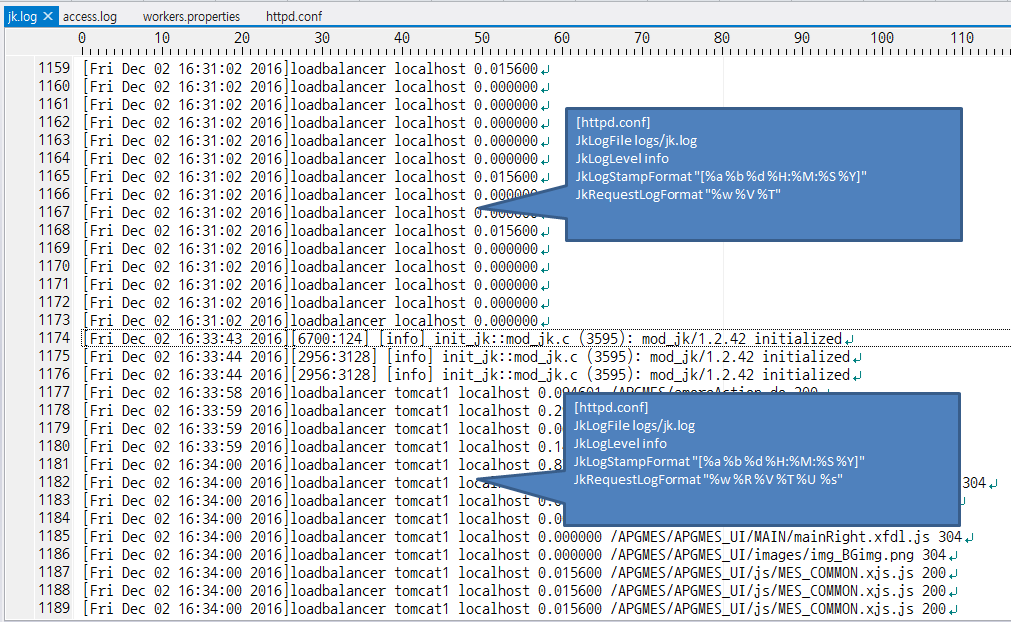
2. mod_jk의 라우팅 로그를 보려면 httpd.conf 파일에
JkRequestLogFormat “%w %R %V %T %U %s” 옵션을 추가하자
[workers.properties]
worker.list=loadbalancer

worker.tomcat1.type=ajp13
worker.tomcat1.host=localhost
worker.tomcat1.port=8009
worker.tomcat1.lbfactor=1

worker.tomcat2.type=ajp13
worker.tomcat2.host=localhost
worker.tomcat2.port=8010
worker.tomcat2.lbfactor=1

worker.loadbalancer.type=lb
worker.loadbalancer.balance_workers=tomcat1,tomcat2
[httpd.conf]
LoadModule jk_module modules/mod_jk.so


<IfModule jk_module>
JkWorkersFile conf/workers.properties
JkLogFile logs/jk.log
JkLogLevel info
JkLogStampFormat "[%a %b %d %H:%M:%S %Y]"
JkRequestLogFormat  "%w %R %V %T %U %s"
JkMount /*.jsp loadbalancer
JkMount /*.js loadbalancer
JkMount /*.do loadbalancer
JkMount /*.html loadbalancer
JkMount /servlet/* loadbalancer
JkMount /*.gif loadbalancer
JkMount /*.png loadbalancer
JkMount /*.jpg loadbalancer
</IfModule>
[web.xml]
<web-app>

   <distributable/>
</web-app>
[server.xml]
<Engine defaultHost="localhost" name="Catalina" jvmRoute="tomcat1">
<Cluster className="org.apache.catalina.ha.tcp.SimpleTcpCluster"/>
<Host appBase="webapps" autoDeploy="true" name="localhost" unpackWARs="true">
<Valve className="org.apache.catalina.valves.AccessLogValve" directory="logs" pattern="%h %l %u %t "%r" %s %b" prefix="localhost_access_log." suffix=".txt"/>
<Context docBase="MES" path="/MES" reloadable="true" source="org.eclipse.jst.jee.server:MES"/></Host>
</Engine>
SELECT TRIM(REGEXP_REPLACE(‘(010)-1!@1 1&%1-22**2 2’, ‘[^[:alnum:]+]’, ”))
FROM DUAL;
vmware에 윈도우10 설치
atom편집기 설치
highlight등의 팩키지 설치
node.js 설치
npm 명령으로 express, socket.io, nodemon 설치
[Node.js/Socket.io 강좌] 실시간 채팅 웹사이트 만들기 [출처] [Node.js/Socket.io 강좌] 실시간 채팅 웹사이트 만들기|작성자 azure0777
vmware에서 실행한 웹서버를 hostpc에서 접속하기 위해서는
hostpc에서 vmnetcfg.exe를 실행해서 VMnet8-NAT 설정을 해줘야한다.
방화벽도 인바운드를 추가
VMWare로 가상 운영체제를 통해 서버 돌리기(컴퓨터매니아의 컴블로그)
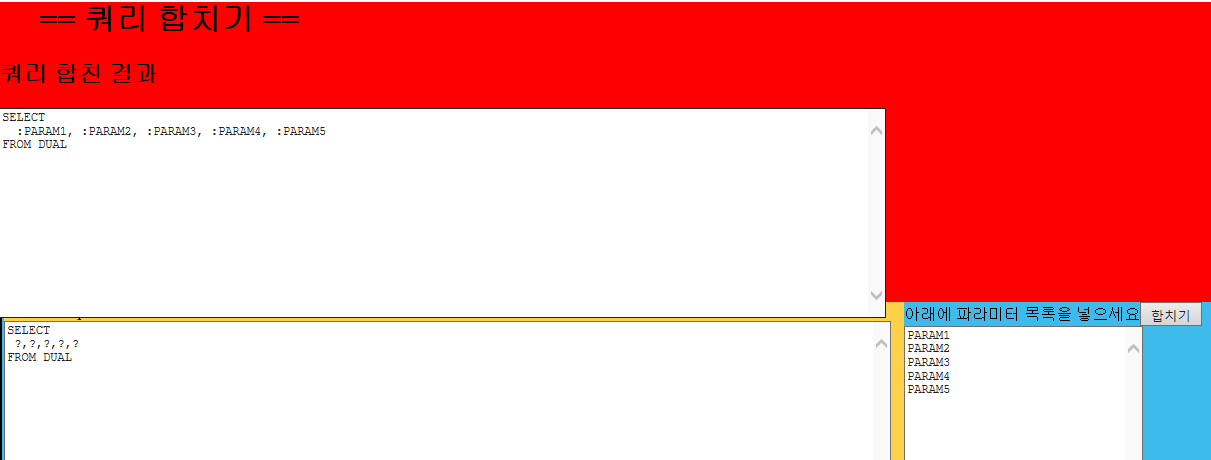
어떤 미친쿼리같은 경우 물음표 파라미터를 몇십에서 백개정도로 사용하는 쿼리가 있는데, 쿼리를 분석하기에 무지 힘들어서 물음표쿼리를 named쿼리로 변경해주는 jsp페이지를 만들었다.
기본소스는 “까먹지말자!(이글루스)” 권남님 블로그님에게서 가져왔으며
http://egloos.zum.com/kwon37xi/v/1897209
사용상 편의 때문에 나한테 맞게 조금 수정했다.
JoinQuery.jsp
———————————————————————————————————
<!DOCTYPE html PUBLIC "-//W3C//DTD HTML 4.01 Transitional//EN" "http://www.w3.org/TR/html4/loose.dtd">
<%@ page contentType="text/html;charset=UTF-8" pageEncoding="UTF-8"%>
<%@ page import="java.util.*"%>
<%!
/** 파라미터 개수 */
public static final int NUMBER_OF_PARAMS = 200;
/** 쿼리와 파라미터 합치기 */
public static String joinQuery(String query, String [] params, String [] isString) {
int currentIndex = query.indexOf('?');
if (currentIndex < 0) {
return query;
}
StringBuffer resultQuery = new StringBuffer(query.substring(0, currentIndex));
int countOfQuestionMark = getCountOfQuestionMark(query);
System.out.println("물음표 개수 : " + countOfQuestionMark);
for (int i = 0; i < countOfQuestionMark; i++) {
if (params[i] == null) {
resultQuery.append("NULL");
} else if (isChecked(isString, i)) {
resultQuery.append(converToSqlString(params[i]));
} else {
resultQuery.append(params[i]);
}
if (i == countOfQuestionMark - 1) {
resultQuery.append(query.substring(currentIndex + 1));
} else {
int nextIndex = query.indexOf('?', currentIndex + 1);
resultQuery.append(query.substring(currentIndex + 1, nextIndex));
currentIndex = nextIndex;
}
}
return resultQuery.toString();
}
/** 문자열로 지정된 것인가? */
public static boolean isChecked(String [] isString, int value) {
if (isString == null) {
return false;
}
String valueStr = String.valueOf(value);
for (int i=0; i < isString.length; i++) {
if (valueStr.equals(isString[i])) {
return true;
}
}
return false;
}
/** 문자열에 들어 있는 ' 를 ''로 바꾼다. */
public static String converToSqlString(String str) {
return "'" + str.replaceAll("'", "''") + "'";
}
/** 문자열에 포함된 ?의 개수 */
public static int getCountOfQuestionMark(String str) {
int count = 0;
int currentIndex = 0;
String temp = str;
while ((currentIndex = temp.indexOf("?", currentIndex)) > 0) {
count++;
currentIndex++;
}
return count;
}
/** HTML 특수문자 변환 */
public static String value(String str) {
if (str == null) {
return "";
}
String temp = str;
temp = temp.replaceAll("&", "&");
temp = temp.replaceAll("<", "<");
temp = temp.replaceAll(">", ">");
temp = temp.replaceAll("\"", """);
return temp;
}
public static String value(String [] params, int index) {
if (params == null) {
return "";
} else if (index >= params.length) {
return "";
}
return value(params[index]);
}
%>
<%
request.setCharacterEncoding("UTF-8");
String query = request.getParameter("query");
String [] params = request.getParameterValues("params");
String [] isString = request.getParameterValues("isstring");
%>
<html>
<head>
<title>쿼리와 파라미터 합치기</title>
<style type="text/css">
html, body {
margin:0;
height:100%;
}
#wrapper {
margin:0 auto;
width:100%;
height:100%;
}
#resultArea {
height:300px;
width:100%;
background:red;
}
#leftArea {
float:left;
width:900px;
min-height:100%;
background:#FFD149;
margin-left: 5px;
}
#rightArea {
min-height:100%;
background:#3EBAEB;
border-left:3px solid #000;
}
</style>
</head>
<body>
<script type="text/javascript">
function getParam(obj){
var parameters = document.getElementById("parameters");
var lines = parameters.value.split("\n");
var input_params = document.getElementsByName("params");
for(var i=0;i<lines.length;i++){
input_params[i].value = ":"+lines[i].trim();
}
}
</script>
<div id="wrapper">
<div id="resultArea">
<h1> == 쿼리 합치기 ==</h1>
<%if (query != null && query.trim().length() > 0) { %>
<h2>쿼리 합친 결과</h2>
<textarea rows="15" cols="120" style="font-size: 12px;"><%= joinQuery(query, params, isString) %></textarea>
<hr />
<%} %>
</div>
<form action="JoinQuery.jsp" method="post">
<div id="leftArea">
<span>아래에 PreparedStatement 쿼리 문장을 넣으세요</span>
<textarea name="query" rows="40" cols="120" style="font-size: 12px;"><%=value(query)%></textarea>
</div>
<div id="rightArea"><span>아래에 파라미터 목록을 넣으세요</span><input type="submit" value="합치기" />
<textarea id="parameters" rows="40" cols="30" style="font-size: 12px;" onchange="getParam()"></textarea>
<div id="inputDiv" style="visibility: hidden;">
<%for (int i=0; i < NUMBER_OF_PARAMS; i++) { %>
<input style="font-size: 12px;" name="isstring" type="checkbox" value="<%=i%>" <%=isChecked(isString, i) ? "checked" : "" %> /> 문자형?
<input style="font-size: 12px;" name="params" type=text" width="120" size="120" value="<%=value(params, i)%>"/>
<br />
<%} %>
</div>
</div>
</form>
</div>
</body>
</html>
———————————————————————————————————
select sql_id, child_number, sql_text, sql_fulltext, parsing_schema_name -----①
, sharable_mem, persistent_mem ,runtime_mem -----②
, loads, invalidations, parse_calls, executions, fetches, rows_processed -----③
, cpu_time, elapsed_time-----④
, buffer_gets, disk_reads, sorts-----⑤
, application_wait_time, concurrency_wait_time-----⑥
, cluster_wait_time , user_io_wait_time-----⑥
, first_load_time, last_active_time -----⑦
from v$sql
where to_char(last_active_time,'yyyymmdd') = '20160908'
오라클 V$SQL에 관련해서 잘 설명한 블로그가 있어서 링크해놓는다.
http://doraeul.tistory.com/80 – 도래울님 블로그